ET113 Image Viewer & Product Bible
Contents
0. Overview
1. Menu
2. Toolbar
3. Operations
4. Product Sales/Shipment Records (Product Bible)
5. Resizing Images
6. Resizing an Image
7. Image Scanning
8. Image Printing
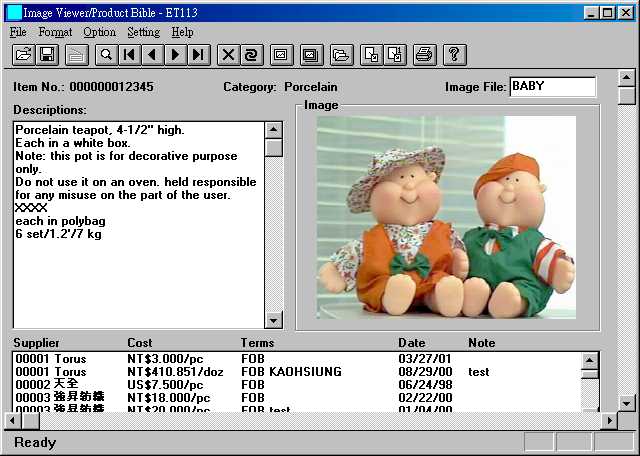
ET6.1 closely integrates text data and images. A single Item No. will lead to both product data and its image.
The graphical presentation of a product is usually in image, seldom in vector graphic. In ET6.1, we use JPEG as the standard image format. (For more image formats, refer to the Format menu below.)
This program lets users view a product's image, description, packing, suppliers and costs in a single screen. Users can choose to show or hide image or costs. For a shown product, users can retrieve its sales records as well as shipment details for a certain period of time.
The program can work with scanners or digital cameras to load images and save them as desired image files after proper resizing. Such a captured image can be linked to an item in product file here without resorting to other programs.
Image files that are not related to ET6.1 can be viewed using this program. For example, a TIFF image attachment of your customer's e-mail can be first saved and then opened by this program. You can also use this program to change the formats of image files.
![]()
File
Option
![]()
| To open an image file in the format of JPG, BMP, DIB, TIF, PCD, PCX, or TGA. | |
| To save the currently loaded image into a format of JPG, BMP, DIB, TIF, PCD, PCX, or TGA. | |
| To scan or capture images. | |
| To delete the currently loaded product. You can choose to delete the associated image file, costs and BOM data at the same time. | |
| To change the image file name. | |
| To launch a new modeless window with a list box for item numbers. Clicking an item number to show its image. The pop-up window will remain on screen until cancelled by the user. (More details below) | |
| To retrieve sales and shipments records of a product. | |
| Resizing images. Used to resize many images at a time. | |
| Resizing an image. Also to specify if to reduce image size automatically after capturing. | |
|
![]()
Use the ![]() button in the
toolbar to retrieve the product. Item No., description, packing, image and supplier
costs will be displayed as shown above. If you selected Hide Image in Option
menu, image would not be displayed. If you selected Hide Costs, the contents in
the list box at the bottom of the window would be blanked.
button in the
toolbar to retrieve the product. Item No., description, packing, image and supplier
costs will be displayed as shown above. If you selected Hide Image in Option
menu, image would not be displayed. If you selected Hide Costs, the contents in
the list box at the bottom of the window would be blanked.
Description and costs are not updateable. Image file name can be
added or modified by type the correct name and clicking ![]() button.
button.
Three options appear after you click the delete button ![]() :
:

If you want to know available item numbers before viewing a particular image, click
the ![]() button to launch the following modeless
dialog box:
button to launch the following modeless
dialog box:
 |
Use the Next and Previous buttons to find a range of items that might include the desired item. After the item is in sight, double-click on it or click to select and press OK. Information of the item will be displayed. To see information of another item, do the same on that item. This modeless dialog box is different from the more ordinary modal dialog boxes you usually met. It remains on the screen till you intentionally cancel it. That is, you do not have to cancel it to proceed with other tasks. This dialogue box, as well as the list of items, will stand ready for more selections before it is destroyed. |
![]()
4. Product Sales/Shipment Records (Product Bible)
If you want to know sales information for the loaded item, click ![]() to retrieve the latest 150 sales
records:
to retrieve the latest 150 sales
records:
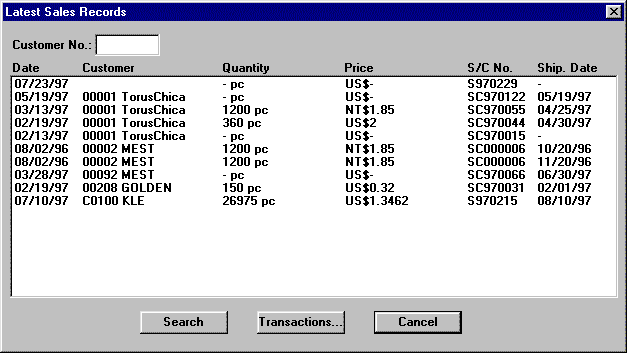
These records are ordered by reverse order dates. By default, records with all customers are shown. To specify a customer, key in the customer's number and click the Search button. For shipment transactions of a sales record, select the sales record and click the Transactions button or double-click on that record. Underneath is a window that shows these transactions:

![]()
Images need different sizes to suit different uses. A device with higher resolution usually requires larger image size. For example, since the resolution of a printer is much higher than that of a monitor (mostly likely: 600 vs. 96), images suitable for screen display are not necessarily suitable for printing. An image suitable for printing may have no problem being displayed properly, but its large size could slow down the display speed. This may be of no consequence in the environment of a stand-alone computer or a local-area network, but it can become a serious problem on the Internet.
Let's say that you shot a 640 x 480 image with a digital camera. The image is quite okay when printed as a 4-inch wide picture. When displayed on the screen, this 640 x 480 image can take up the whole screen. Perhaps you would prefer an image which is only half the size (320 x 240), so that you could show text alongside the image. If you needed to send the image to a customer through e-mail, 320 x 240 might be a good-enough size. In both cases, the file size of the smaller image is a quarter of that of the original image. In e-mail transmission, if the smaller image takes 20 seconds to transfer, the bigger image will take 80. Imagine how much saving you can achieve with the right sizes.
Next suppose that you had a Web site to display company products. For a single page, there might be a few dozen products. When a customer hit the page, after a 10-second wait, the customer might get impatient and switch channel. If you cut the sizes of image files to half (the sizes as displayed on screen remained unchanged), the same page would now need only 2.5 seconds to download. Customers would be much happier.
The purpose of this program is to reduce your image files to a smaller size, so as to fit for Internet use. If you do not have Internet applications or just need to transmit one or two images occasionally, you do not need to use this program. If you have a Web site and a lot of image files, you should consider to use this program to improve you Web site efficiency.
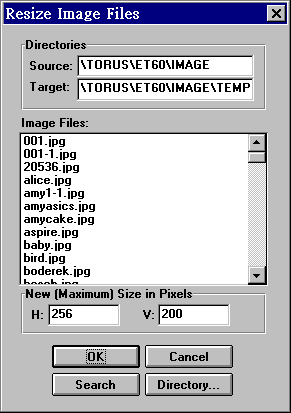
Click ![]() and you will see a dialog box similar to one to the
lower-right-hand side.
and you will see a dialog box similar to one to the
lower-right-hand side.
|
Source Directory is the folder where existing images are stored. Target Directory is the folder to save the newly-created, resized, images. Key in the folder names directly or click the Directory button to select. If the Source and Target are the same, the resized files will overwrite the original files. After you have entered the folders, click the Search button. All JPEG files in the source folder will be shown in the Image Files list box. Double-click on files to remove them from the selection. Next enter new width and height (in pixels). Because the aspect ratios of images vary, these two numbers represent the maximum width and height for all new images. Aspect ratios of images will be maintained. Click the OK button to resize selected images and save the newly-created files to the Target directory. Do not inadvertently overwrite original images. There is no recourse for such a mistake. |
 |
![]()
For better result, you have to set scanning resolutions above certain numbers. The sizes (measured by width pixels and height pixels) of images thus produced are likely to exceed what are actually needed. You can use the Resize function to reduce the size of the scanned image, so that less hard disk space is used, efficiency is increased and transmission time is lowered.
The sizes of images taken by digital camera are fixed. Reduce them whenever suitable.
Click Setting->Resize Acquired Image menu item or the ![]() button in toolbar:
button in toolbar:
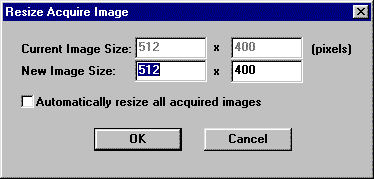
Current Image Size is the size of the current image. It cannot be modified. New Image Size is the size to be desired. The left text box is for horizontal width and the right text box is for vertical height (both in pixels). After you enter the width pixel value, a height value will be automatically calculated to maintain the aspect ratio of the image.
If you want all images to be first modified to this size after capturing, check the Automatically resize all acquired images check box. This will save you the time to resize an image after each capture.
![]()
Before you can scan images, you need to select the right driver. Click File->Select Source menu item:
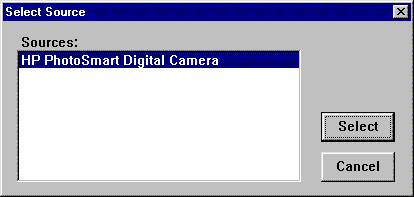
Select a proper 16-bit source (there may be more than one source on you machine). Then click File->Acquire menu item to start scanning.
The scanned image will be displayed in the image box to the right of the
program window. If you had
set automatic resize (see previous section), the image would be resized before display. The image
is in memory and not yet saved to disk. Click ![]() to save it. To associate the image with a product, click
to save it. To associate the image with a product, click ![]() to retrieve the
product, enter the saved image filename in the Image File field, and click
to retrieve the
product, enter the saved image filename in the Image File field, and click ![]() .
.
For digital cameras supporting the TWAIN interface, you can use the same procedure to download images you have taken.
![]()
Here a much easier and more intuitive way (as compared to Photoshop's) is provided for printing an image onto a page. The other function lets you print copies of the same image over a page.
To print, retrieve the product or open the image first. Then click the ![]() button. For better results, the printing quality should be at
least 150-300 pixels per inch, varying according to the intrinsic quality of the
printer used.
button. For better results, the printing quality should be at
least 150-300 pixels per inch, varying according to the intrinsic quality of the
printer used.
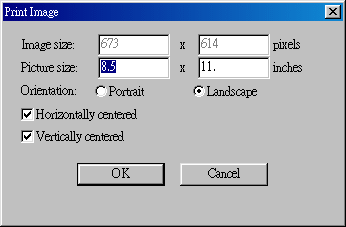 |
Print One Image procedures:
|
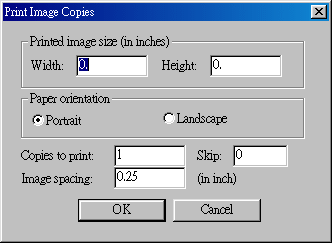 |
Print Copies procedures:
|
![]()
Last modified: July 2002