ET111 Product & Supply Data Entry
Contents
0. Overview
1. Menu
2. Toolbar
3. Entry Fields
4. Searching for an Item
5. Insertion, Deletion, Updating of an Item
6. Showing the Image
7. Insertion, Deletion, Updating of a Supply
8. Supplier Lookup
9. Supply Lookup
10. Product Tag Printing
11. Cost/Weight Breakdown and Harmonized Tariff Schedule
12. Image and Catalog Printing
13. Bar Code Printing
14. Selective Product Item Printing
20. System Codes
This chapter describes insertion, deletion and updating of a product item and its costs. This is the first program of ET6.1; other programs will also use functions and usages described here.
A product data contains Item No., Description, Category, Image filename, Packing information, etc. These fields are placed at the upper part of the screen. The lower part of the screen is used to show suppliers and their quotes for the product. A product may have an unlimited number of suppliers, while each supplier may have different quotes for different terms. For example, a supplier can offer both an FOR Taiwan price and an FOR Hong Kong price. Different packing information may also be applied on separate quotes.
The Category field is used to classify products. If you are in the automobile parts business, you can enter vehicle type here, e.g., Toyota Camry 1997. Product data can be sorted by categories; data of the same category can be easily found. For all documents (such as quotations, sales confirmations or invoices), we have a categorized format that aggregates items based on categories.
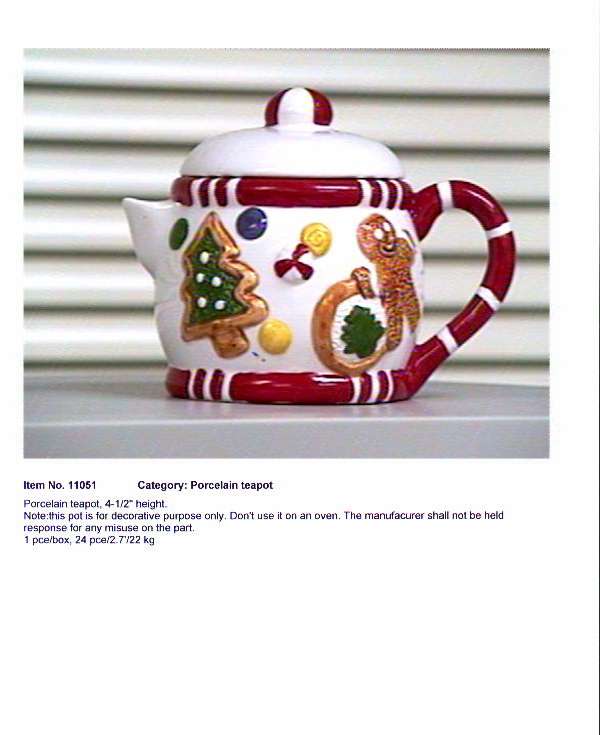
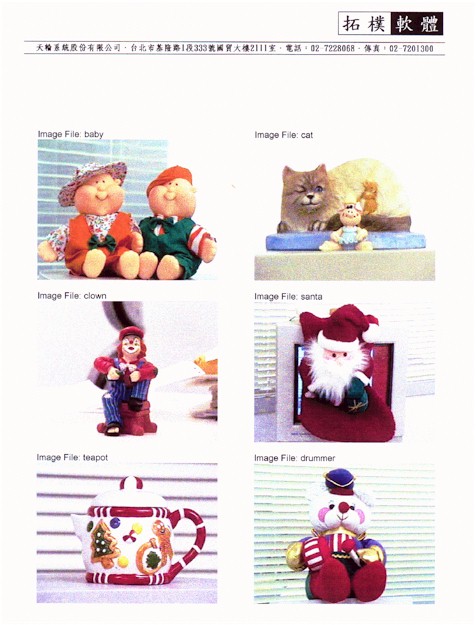
The Image filename field is for the file name of product image. Images can be acquired from scanners, digital cameras, capture cards, etc. and saved in standard JPEG format (do not use progressive JPEG format). Images can be displayed on monitor screen or printed out in several formats: 1, 6, 12, or 24 images per page. Product and image data can be combined to produce product catalogs; catalogs can be in 2-column, 3-column or 4-column format. Catalogs can also be exported as Word documents, which can be opened and reviewed on screen or sent out as e-mail attachments.
Product data are ordered in five ways: Item No., category, entry date, other code, and bar code. Inquiry using other code is fast. Make good use of this field. For example, you can enter the OEM numbers of parts in this field.
For a product with more than one supplier or quote, one can be specified as the priority supply. When doing quotations or placing purchase orders, priority supply, if any, will be used as default. A priority supply is composed of Supplier No., terms and port.
If a product comes with a standard price, the price can be used in quotation and sales confirmations. (Customer Item Number also has a field for standard price.)
An Item No. can be either sequentially generated by the system or freely keyed in by the user. The program can print 128B bar codes, which are to be used for showroom management. (You can get the quote of an item by scanning its bar code.) Product tags can also be printed. Invoices for some countries have to include cost or weight breakdown. For such purposes, you enter cost and weight ratios and the U.S. customs duty rate.
Model No. is an alias for Item No. Separate item numbers can share the same Model No. For example, products with different packings or prices should be given different item numbers, but some customers may require that the same number be used. In such a case, using model numbers will solve our problems. Each customer item number has a corresponding model number.
Two product description blocks are available. The normal textbox is for description in English or in the language of trade. This description normally appears on documents to be given to customers (e.g., quotations, sales confirmations, invoices, etc.) The textbox called local is for description in Chinese or in the language when communicating with suppliers. Local description is used in documents such as purchase orders, shipment notices and samples orders. If you do not have any use for local description, place remarks or comments there. There is no limit on the length of both descriptions.
Changes in supplier costs (supplies) can be archived. This log is called cost history. This function can be disabled.
Lastly, you can configure the program to allow adding and searching, but deny updating and deleting. That is, you can let others browse data without worrying them modified or deleted.
![]()
File
Option
Setting
![]()
|
|
|
This is the starting point for searching for a product item. You can use Item No., category or other code to locate items. See Searching for an Item below for details. |
|
| First record (item) based on the order selected in Option menu. | |
| Previous record. | |
| Next record. | |
| Last record. | |
|
Insert a new record (an item). Click this button to save data after all fields are entered (some might be blank or with zeroes). A warning is raised when duplication happens. Notice: If you mistakenly clicked Update button when you actually meant for Insert, the previous record, if any, would be replaced by the data currently on screen. |
|
|
Delete a record. You have to locate an item before you can delete it. This icon is grayed and dysfunctional until an item is located and retrieved. |
|
|
Update a record. Locate the record, modify fields and click this button to complete updating. |
|
| Cut. Same as pressing Ctrl+ X. Notice: The toolbar is not functional in dialog boxes. You have to resort to keyboard. | |
|
Copy. Same as pressing Ctrl+ C. Notice: The toolbar is not functional in dialog boxes. You have to resort to keyboard. |
|
|
Paste. Same as pressing Ctrl+ V. Notice: The toolbar is not functional in dialog boxes. You have to resort to keyboard. |
|
After you have retrieved an item, click this button to show the Image (using the underlying image file name, not the file name on screen) . |
|
To add a new supply. Double-click on an existing price in the supply listbox at the lower part of the screen to bring up the dialog box for updating the supply. |
|
Look up suppliers. |
|
|
To retrieve supply information using supplier numbers, supplier item numbers, or our item numbers. |
|
|
To print product tag. |
|
For entering C.C.C Codes, U.S. Customs duty rates and Cost/Weight Breakdown ratios. |
|
| Inspection requirements and details. This remark, if entered, will be automatically shown on inspection report for this item. |
Buttons with asterisk (*) may re-appear in other programs. No duplicate explanation will be given.
![]()
| Item No. | Up to 16 characters. This field is case-sensitive; so 1000a is different from 1000A. |
| Category | This is an index key. Using this key during lookup is fast. One format of quotation has items of the same category aggregated together. ET6.1 Web uses this category and the subcategory field to the right in classifying products. Category is up to 24 character long, and subcategory can be up to 50 characters long. |
| Image file | This field can only be up to 8 characters long and has to conform to file name requirements. That is, some characters that are not permissible for 8.3-format file names are not permissible. Case insensitive. Use system code IMAGE-PATH to set the folder (or directory) for storing image files. The default folder is \torus\et61\image. |
| Model No. | Up to 16 characters long. May be duplicated. |
| Description | Product description in the language of trade (mostly probably English). The default length is 2000 characters, but can be increased to any length by modifying product.str file. |
| Local | Optional description for communicating with suppliers (usually in Chinese). Mostly used in purchase orders, but occasionally in sales confirmation. Combining normal and local descriptions is possible. |
| Inner, Outer, etc. | Inner and outer pack size. Outer is alias to master. Cube volume of outer package, net and gross weights of outer package. Outer unit is imperative and is the unit used through out. It is the unit for full container loads. It is also the unit for quotation. The unit of cube is cubic feet. |
| L, W, H |
Measurements of a master pack (outer package): length (L), width (W), and height (H). Their units can be foot or cm. Click INCH to calculate the cubic-foot volume of an outer package from L, W, H when inch is the measuring unit. Click CM to calculate, again, the cubic-foot volume of an outer package when centimeter is the measuring unit. |
| Price | Reference price for the item. Can be used in quotations and sales confirmations. |
| A | Product code, to be used for customizing customer statistical reports. 5 characters top. Category is supposed to be more granular than product code. |
| UPC | For UPC (11 or 12 numerals) or other bar codes (up to 15 characters). No duplicates are allowed while blanks are acceptable. The buttons on the right are used to check the validity of either a UPC or an EAN code. |
| Priority supplier No. | Specifies a priority supply for quotations and purchase orders when there are more than one suppliers and quotes. Complete criteria include supplier number, plus terms, plus port. |
| Case UPC | The UPC to be printed on outer package. |
| Entry date | The date when item first entered. |
| Update date | The date when item last updated. |
| Other code | Up to 16 characters. An optional item number that may be used as an OEM number for auto parts, catalog item number or location code for showroom sample. The code is an index key and can be speedily retrieved. |
| Margin adjustment | To set a default margin (percentage) for this particular product. The number may be automatically included in calculating quotes. Can be negative. The real margin is the sum of this adjustment and margin on customer. |
| Minimum quantity | Minimum ordering quantity, in outer unit. |
| Lead time | Days needed between order and shipment. |
![]()
Clicking ![]() icon on
the toolbar to bring up the following dialog box:
icon on
the toolbar to bring up the following dialog box:

If you already know the item number, type the number in the Item No. text box and press <Enter> key or click the OK button.
If you are not sure of the exact Item No., look it up before you choose. Here is how. Product data are ordered by Item No., Category, Entry Date, Other Code or Bar Code (UPC). Use your knowledge about the item you want to retrieve. Select data order first. If possible, enter a starting position for that order in the corresponding text box. For example, if you are looking for an item that has an item number starting with A, type A in Item No. field.
Clicking the Next button now would display approximately 50 product items. To display the next 50 items, click Next again. The Previous button does the same thing, but in reverse (usually descending) order. Repeat the process until the desired item appears. Clicking the list item will put its item number in the Item No. text box. With the desired item number in field, click OK. Another way to combine these 2 actions is double-clicking the list item.
Additionally, you can use ![]() ,
, ![]() ,
, ![]() or
or ![]() to search for the
first, the previous, the next or the last item, based on the order specified in
menu Option.
to search for the
first, the previous, the next or the last item, based on the order specified in
menu Option.
![]()
5. Insertion, Deletion, Updating of an Item
Insert
Enter data into text boxes on the screen. Click ![]() to insert the item. If the contents of an item are similar to those
of another item, retrieve that item first. Change Item No. and do
necessary modifications on other fields. Click
to insert the item. If the contents of an item are similar to those
of another item, retrieve that item first. Change Item No. and do
necessary modifications on other fields. Click ![]() to
complete the insertion. Item No. cannot be duplicated. It can be freely
entered by you or a serialized number can be generated by the
system.
to
complete the insertion. Item No. cannot be duplicated. It can be freely
entered by you or a serialized number can be generated by the
system.
Delete
Retrieve the item to be deleted first. Click ![]() and the following dialog box will be brought up:
and the following dialog box will be brought up:
 |
Costs & cost log: check to remove all
associating supplies and cost history. BOM data: check to have bill of materials data removed. Image File: check to remove the associating image file from image folder. After checking or unchecking the available options, click OK to complete the deletion process. |
Update
Retrieve the item to be modified and modify. Click ![]() to complete updating. If you get a
warning saying "Record tampered. Try again," it means that someone has
updated the same item before you do. You must repeat the updating process to
update the item. (You should read what the another person has done.)
to complete updating. If you get a
warning saying "Record tampered. Try again," it means that someone has
updated the same item before you do. You must repeat the updating process to
update the item. (You should read what the another person has done.)
![]()
For a retrieved item, clicking on ![]() to show its image, if image file field and image file are
available. You can drag the borders of the image window to change its size.
to show its image, if image file field and image file are
available. You can drag the borders of the image window to change its size.

![]()
7. Insertion, Deletion, Updating of a Supply
To add a new supply to an item, click ![]() in the toolbar to
bring up the Item Cost dialog box (below). Fill up the fields and click the Insert button.
Use Copy Supply Data from Another Item button to copy supply data from another
item. There is no limit on the length of Note field. A separate packing data
is available for each supply. When making quotations, you can choose to use this
supply packing instead of that of the product.
in the toolbar to
bring up the Item Cost dialog box (below). Fill up the fields and click the Insert button.
Use Copy Supply Data from Another Item button to copy supply data from another
item. There is no limit on the length of Note field. A separate packing data
is available for each supply. When making quotations, you can choose to use this
supply packing instead of that of the product.
In case that an item is composed of parts, assuming parts and BOM data are complete, the Calculate Cost from BOM button lets you calculate the assembled cost.
To change a supply, double-click on the supply in the supply list box in the bottom of the product data entry screen. Item Cost dialog box shows again. Modify the fields and click the Update button. Click the Delete button if you want to remove the supply.
The Cost History button is for displaying all previous quotes by this supplier in the order of dates when quotes were entered. The cost log is by default automatically established. It can be disabled by configure system code COSTLOG.
Supply Dialog Box
Cost History

![]()
While entering priority supplier, if you need to look up suppliers, click ![]() on the toolbar to bring up the following
dialog box. This lookup dialog box is very similar to the dialog box for Searching
for an Item explained above. The same techniques can be applied in
searching for a supplier.
on the toolbar to bring up the following
dialog box. This lookup dialog box is very similar to the dialog box for Searching
for an Item explained above. The same techniques can be applied in
searching for a supplier.
![]()
The ![]() icon lets you look up cost data of suppliers. The following is a screenshot:
icon lets you look up cost data of suppliers. The following is a screenshot:

![]()
Before printing the tags, you have to let the computer know the size and layout of label paper. Click Setting->Label menu item to enter the following dialog box. The numbers can be pre-defined by system code PROD-LABEL.
Top margin means the distance from the top of the printable area, not the paper, to the first line on the topmost label. Label width is the distance from the left margin of a label to the left margin of a label to its right, not the width of a label. Horizontal space is the blank space between two neighboring labels. Changes made here only applies to the current printing session; the next time you use the program, all numbers will return to what the system code specified.
After you have set the sizes, click ![]() to prepare for printing. The dialog box is as follows:
to prepare for printing. The dialog box is as follows:
Enter the Item No. range. Click the Search button to show the items in the list box. You can remove an item by double-clicking on it or by using a combination of clicking and Delete. To use a label paper not completely used from last printing, use Beginning Row and Beginning Column to specify where the printing should start. For fresh paper, both columns should read 1.
![]()
11. Cost/Weight Breakdown & Harmonized Tariff Schedule
To fill in data of cost and weight breakdown ratios as well as
HTS code and duty rates, click the ![]() icon. These data are used in shipping documents where cost or weight breakdown
lists are needed. Select Cost Breakdown tab or Weight Breakdown tab to switch
and enter ratios.
icon. These data are used in shipping documents where cost or weight breakdown
lists are needed. Select Cost Breakdown tab or Weight Breakdown tab to switch
and enter ratios.
![]()
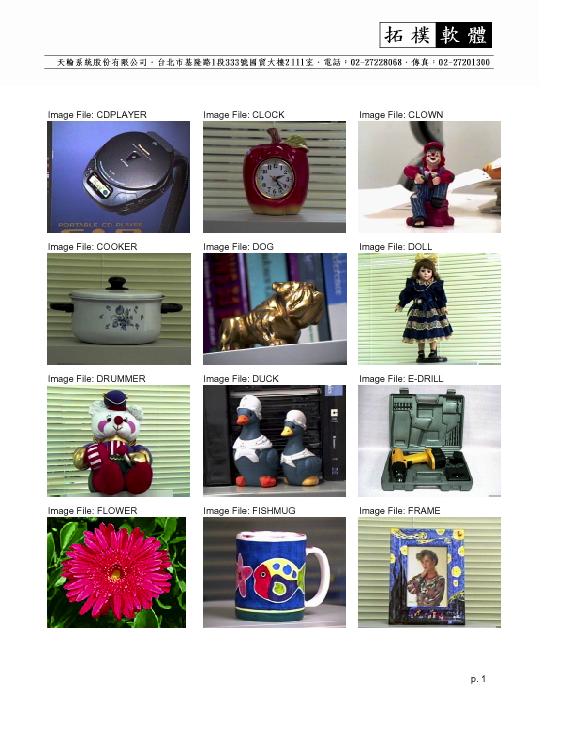
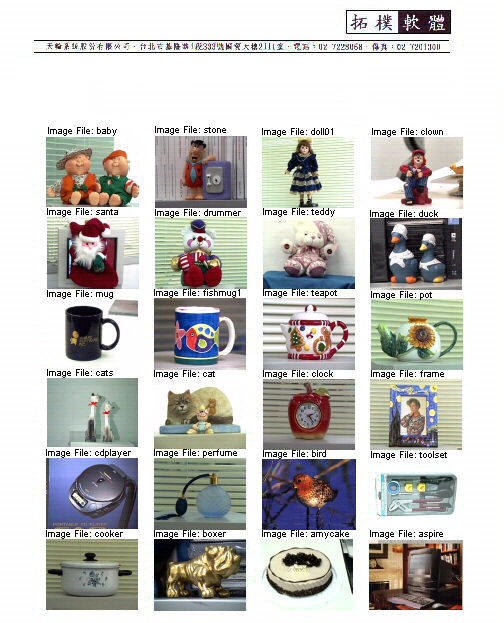
12. Image and Catalog Printing
Click ![]() on the toolbar to print product images. You can choose from several formats:
on the toolbar to print product images. You can choose from several formats:
One-Image Page: one image each page.
Multi-Image Page: 6, 12
or 24 images per page.
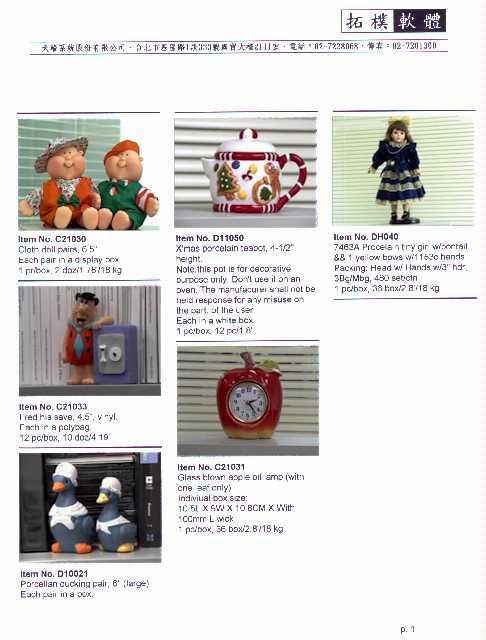
Product Catalog: Text and images are combined into
catalogs. The
catalog page can be of Two, Three, or four columns. (This function has a
better interface in ET112. Use ET112. The function in
this program will probably be removed later.)
Printing a single image: |
Retrieve an item first before you can print. Choose the desired description: you can use standard, local or a combination of both. Instead of the full description text, you can opt to use short description . When you check Show cost, you can choose to print only the priority supply or all suppliers and costs. |
Printing multiple images: |
You can use either item numbers or image file names to specify the images, but not both. Separate images with commas. You can specify 6, 12 or 24 images for each page. If you want to print letterhead, check the Print letterhead checkbox and select the company to show. If you want to print images not saved in the default folder (usually f:\torus\et61\image), select Use image file names from Choose One group box. Check Use other directory checkbox and key in the folder name. Pressing the Get Files button will read all the image files in the new folder and place them in the list box. For a blank folder name, Get Files will get all image files from the default folder. |
Printing product catalog: |
There are three ways to select items for a catalog (all inside Select options group box):
The three ways can be used in combincation. Remove unwanted items using the Delete or Clear button. If you check On MS Word, the catalog will be output in Word format. The document can surely be modified and sent as an e-mail attachment. |
![]()
Before you print bar code labels, you have to set up the size and layout of label paper. Click Setting->Barcode Label menu item to get the following dialog box. Modify as needed. You can pre-set these numbers with system code BAR-LABEL. Top margin starts at the top of the printable area. Label width is the distance between the left edge of a label and that of the label to its right. Label spacing is the width of the blank space between two neighboring labels. Code height is the height desired for bar codes.
After setting up label sizes, prepare to print (see dialog box below). Enter the range of items in the Item No. Range group box and click the Search button to get items to show in the list box. Additionally or separately, you can append individual item to the list box.
A standard bar code label has bar code, description of the item, packing and supplier information. Bar Code Only allows you to print only bar codes. Text Only allows you to print only text. Choose Both to print both bar code and text. Beginning row/column specifies where the first label should start. This lets you use label paper left from last printing. For fresh paper, use 1/1. The 128B bar code prints all sixteen characters of Item No. (including spaces). No matter how long the Item No. really is, all bar codes printed are of the same width. Trim Item No. space check box lets you print the actual Item No. length; spaces are not included in the 128B bar code. The widths of bar codes may vary. The price shown on a bar code label is that of a priority supply, or that from the first available supply in the absence of a priority one. The Use product price check box offers an option to use the product price, instead one from a supplier. The date shown on the label is that of the last modification.
![]()
14. Selective Product Item Printing
Click print icon on the toolbar and select Product Data Listing from the pop-up menu. In the displayed dialog box (below), key in Item No. in the Item No. field, followed by clicking the Add button. The Item No. will appear at the Selected Item Numbers listbox on the left. You can alternatively click the Browse... button to search for an item. The Item No. you selected shows in the Item No. field as well as the list box. This two methods can be used interchangeably. After all desired items are selected, click OK button to start printing. To remove an item from the list box, double-clicking the item number you want to delete.
Text in Print Note will be printed right beneath the title of the report. The contents of a list item can be selected by checking or unchecking various checkboxes.
![]()
| Code | Column | Value | Explanation |
|---|---|---|---|
| 0123456789 | 2 | 9876543210 | Used to transforming a price into a disguised number, to prevent outsiders from interpreting the price. With a value of 9876543210, $2.45 will become $7.54. No transformation is done if the code is not set. Usage: bar code labels. |
| BAR-TEXT | 4 5 |
2.25 24 |
Width of bar code in bar code label. (in
inches) Length of product description in bar code label. |
![]()
Last modified: September 2007